Supports in 3D Printing: Full Guide
Supports in 3D Printing.
3D printing has revolutionized the creation of objects, making it possible to create complex geometries and intricate designs. However, to bring these models to life, Often a small but fundamental help is needed: the supports in 3D printing.
But what exactly are they, Why they are so important and how to manage them? Let's dive deeper into the topic in this comprehensive guide.
What are Supports in 3D Printing?
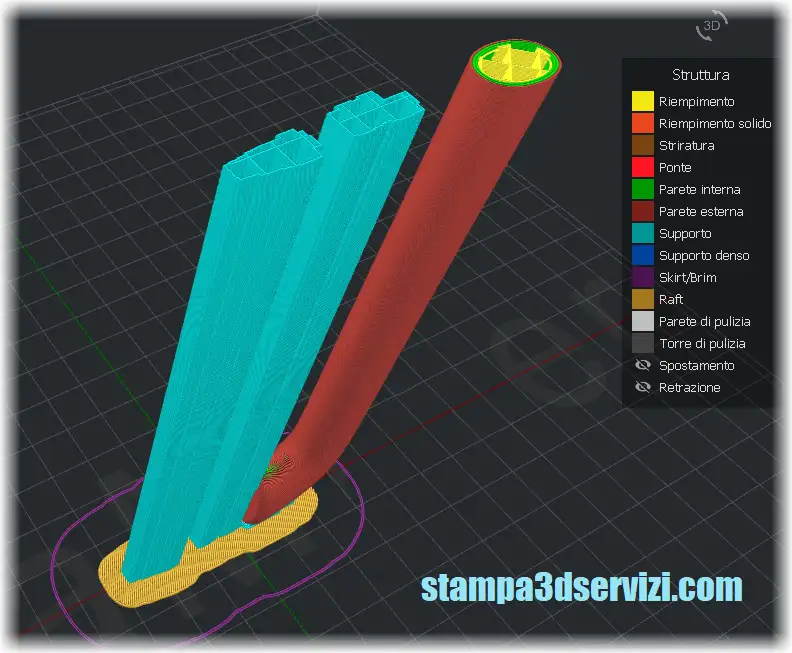
Supports in 3D printing are temporary structures, generated by the same slicing software, that are printed together with the parent object. Their primary function is to support those parts of the model that “hang in the void” or that have very steep angles to the build deck, the so-called “Overhang” or “Rush”.
Without these supports, The extruded material for these parts would not have a base on which to settle, would collapse during printing, compromising the success of the model.
Generally, supports in 3D printing are used to create parts with complex geometry or with corners that are difficult to print, which evidently require to be supported during the printing process.
In practice, supports allow you to create three-dimensional objects that would otherwise be impossible to print correctly, ensuring greater precision in details and better finishes even in critical areas.
Why and When Supports Are Needed?
Supports become indispensable in different situations:
Overhang (Rush): When a part of the model extends horizontally or nearly horizontally with nothing underneath to support it. Gravity would cause the newly deposited layers to collapse.
Bridges (Bridges): Sections that connect two points but are suspended between them. Even though FDM 3D printers are capable of “scaffolding” Small distances, For longer or more complex bridges, supports are required.
Steep Corners: Generally, if an angle tilts more than 45 degrees from the vertical, Requires support. The greater the angle, the greater the need for support to avoid deformation or subsidence.
Suspended Detailed Features: Small details, spikes or decorative elements that do not rest directly on the platform or on consolidated underlying layers.
Preventing Collapse: In models with thin walls or fragile structures, Supports can add stability during the printing process, reducing the risk of collapse or deformation due to heat or vibration.
How supports for 3D printing are created
Supports are created during the same 3D printing process. The printer head following the instructions in the GCODE print file, extrudes material layer by layer, at the same time also creating the solid structures that make any supports where some of the parts of the object to be printed will lie.
The supports use the same material used to 3D print the object, then when the printing process is completed, are gently removed manually.
Removing supports requires special attention to avoid irreparably damaging the printed object.
How Media Is Generated and Managed in Slicing Software.
Media creation and management is done entirely in the slicing software before printing starts. This is where the software analyzes the 3D model and, Based on user-defined settings, Determine where supports are needed and how to build them.
Key settings include:
Overhang angle (Support Overhang Angle): Determine the critical angle beyond which the software will start generating media (typically set at 45-50 degrees).
Media Density (Support Density): Check how much material is used for the structure of the support. A higher density offers a stronger support but consumes more material and is more difficult to remove.
Pattern Type (Support Pattern): Choose between grid, Lines, zig-zag, tree, etc.
Horizontal and Vertical Distance (Support Distance): Critical to ensuring media is easily removable. These settings define the space between the media and the printed object.
Learning how to play around with these settings in your slicer is crucial to optimizing your prints, balancing the need for support with ease of removal and quality of finish.
Types of Media Structure Managed by the Slicer:
Slicing software offers several options for support geometry:
Grid Mounts (Grid): They create a dense lattice structure under the overhang. They are very sturdy but can be difficult to remove and leave noticeable marks on the surface of the object.
Line Mounts (Lines) or Zig-zag: Create parallel or zigzag lines. They are faster to print and easier to remove than the grid, but they offer slightly less solid support.
Shaft Supports (Tree): Similar to the branches of a tree, they start from a narrow base and branch out to support only the critical points. They are more difficult to set up but use less material, They are easier to remove and leave fewer surface marks. They are ideal for organic or complex models with limited touchpoints.
Types of Media Materials:
Standard Mounts: Printed with the same material as the main object (ES. PLA for a PLA object). They are the most common and cheapest, but require gentle manual removal which, if poorly done, can damage the surface finish.
Soluble Supports: Printed with materials specially designed to dissolve in water or a specific solvent.
Soluble Supports in 3D Printing: An advanced solution
Soluble supports are a big advantage for 3D printing, especially for very complex or delicate geometries.
What are they: They are made with filaments such as the PVA (that dissolves in water) o l’HIPS (that dissolves in Limonene, a solvent).
How they work: They require a 3D printer equipped with double extrusion, so that one extruder molds the main object and the other molds the soluble support material. Once the print is finished, The object is simply immersed in the appropriate solution until the supports dissolve completely.
Advantages: Removal is clean and non-invasive, preserving the surface finish of the object. Allows you to print extremely complex or internal geometries that would be impossible to achieve by manual removal.
Detriments: Soluble materials are generally more expensive than standard filaments. Require a dual-extrusion printer. The dissolution process can take several hours depending on the size and density of the media.
How Support Removal Occurs in 3D Printing?
- Manual removal: For standard media, This is done with tools such as tweezers, Nippers, spatulas or precision knives. It is an operation that requires patience and delicacy to avoid breaking parts of the object or leaving obvious marks (“Scarring”). We recommend removing the larger sections first and then proceeding with the smaller details.
Removal of soluble supports: As seen, requires immersion in water or solvent. This is the cleanest method but requires proper equipment (ES. Ultrasonic tanks to accelerate dissolution), and a certain time.
Post-Processing: After removal, The surface in contact with the substrates may be rough or imperfect. Post-processing techniques such as sanding, The use of putty, Chemical sanding (with care and safety, only for some materials such as ABS) or painting may be necessary to achieve a smooth and uniform finish.
Tips to minimize the use of supports
Reducing the need for media can save time, material and improve the final quality:
Model Orientation: Rotate the model in the slicer to minimize overhangs or make them rest on the platform or less visible areas of the object.
Design Editing: If possible, slightly modify the design of the 3D model to reduce or eliminate critical angles. Beveled corners or fillets can sometimes avoid the need for support.
Test di Overhang: Print small test templates to understand your printer's and filament's capabilities at handling supportless overhangs at different angles.
Conclusion
Supports are an essential tool in 3D printing, Enabling complex designs to be transformed into physical objects. Understand when and how to use them, Which types to choose and how to manage their removal is crucial to achieving successful prints.
You can request an instant quote for the 3D printing online on our platform to have access to technologies and materials managed by experienced professionals, who will be able to optimize printing and the management of any supports to guarantee you the best possible result.